Good Morning! It is Monday once again and hopefully none of you are feeling the Monday's Blues! Recently, (about a month ago) Chelsea from Get Nailed posted her beautifully done Dr. Martens Floral Inspired roses here which completely blew me away at how stunning it is. And few days ago she has posted a tutorial on how she did the roses here - I was blown away the second time. (lol). That did it. I needed to try/attempt another rose manicure!
I had my first attempt at rose nail art here which I wasn't proud of. Everything was all over the place. I hadn't grasp the structure of rose well enough, plus, it was done using acrylics. So today, I'm happy to present to you, my successful rose nail art attempt using nail polishes which I'm satisfied with.
The original idea was to do a blue rose. Reason? My favourite colour is blue! While deciding on blue colour polishes, I recalled a moment when my lecturer critiqued on my work before - "Hmm, not bad. But it would be better if there's lighting". What he meant was, mood lighting. Not the usual white lights. I took his advice and incorporated yellow/evening/sunset light colours onto my work and the picture became a whole lot more interesting to look at. And that led me to add colour lighting onto my roses in this design.
The result? Love the roses!! But I had a dilemma decided the background colour for them. Though I'm pretty sure the roses would pop with a black background, I wasn't in a mood to have black on my nails. Haha! I experimented and compared dark navy blue background vs light colour background. Well, blue background was lovely, but the blue on the rose didn't pop as vivid/brightly as it did on the lighter background. So I went ahead with the lighter background and used a shimmery brown as accents.
I'm so happy that this time, I manage to grasp a little more about rose structure and wasn't blindly putting on colours. Look! My roses do face certain directions (I honestly can't believe how happy I was with this tiny success, Lol!). For the pinky, index and thumb I painted two coats of Essence Toffee To Go. Saran/Cling wrap yellow and white colours over it to make the background a little more interesting. I painted two coats of shimmery brown on both the middle finger and ring finger. And went on painting the leaves first, then the roses.
Well, I guess that's about it. Hope you are loving these as I do. Also, I'm super happy right now! Finally purchased Josh Groban's All That Echoes album! I can't stop smiling embracing the sensation of finally having the CD in my hands - in my possession! And I've been listening to it over and over again. His musics and songs are always so beautiful to listen to! Anyway, I wish you all a Happy Monday! ;)
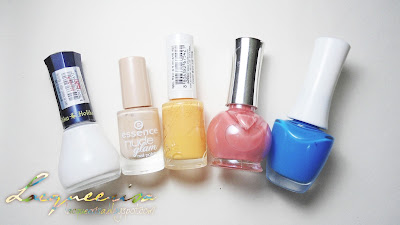
Nail polishes used, left to right :
- Holika Holika - White polish (25)
- Essence Nude Glam - Toffee To Go
- Etude House - COR202
- Colour Combos - CBL132
- The Face Shop - BL602
Nail polishes and tools used, left to right :
- Etude House - GR605
- Lioele - 24
- Bloop - Shimmery Brown
- Revlon - Chocolate Truffle
- DIY Stripper Brush
- Saran/Cling wrap*
*I've put a tiny piece of tissue inside so I don't have use too much cling wrap to scrunch a ball shape. Be sure to create the necessary creases on the surface of the ball shape.


Absolutely gorgeous!!! Love the blue roses (my favourite colour's blue too :)), the colour combination is great in general. I get what he was saying about "mood", it definitely makes some kind of a difference!! :)
ReplyDeleteHigh-5! And thank you! It's pretty amazing to see how a simple tweak changes the overall outcome :)
DeleteSooo beautiful!!! Colors, structure, technique - everything is on the top level! I really love it!!
ReplyDeleteWOw! You just blew me away with your comment! Thank you so much! So glad you love it ♥ !
DeleteLove this mani! The colors are so unconventionnal! :D 1 up!
ReplyDeleteThank you! I know right? Sometimes I feel like a genius! (LOL, kidding!) So awesome to know this mani is loved by you as well :D
DeleteThis is such an original color combination and the roses are beautifuly painted, love them!
ReplyDeleteThank you! I am so in love with the colour for the roses. Can't believe how gorgeous they matched up as well considering they started out pretty random and experimental! And I'm so glad for the improvements I have painting the roses! Aww, this is just wonderful, I mean hearing you all love them as well :D
DeleteWow, love the roses! The colors you used are perfect. :)
ReplyDeleteHi Liz! Thank you! So so happy you love them! :D
DeleteLove it. I like that you stepped out of the box with the addition of blue outlines.
ReplyDeletehaha! Thank you! The blue lines were like trump cards, eh? I loved them together ♥
DeleteSuch a pretty mani! Great job on the roses... they look terrific! :-)
ReplyDelete~ Yun
Hi Yun! Thank you sooo much for stopping by and thanks for the compliment as well! :D
DeleteBeautiful! the model is very detalied, nice work :)
ReplyDeleteThank you! ;)
DeleteExcellent work! I'm very glad I found your blog!
ReplyDeleteThank you! I'm glad you found me too ;D It's always great meeting new people :)
Delete