Ahh Merry Christmas! I hope you're still in the mood for Christmas although I'm late five days (give or take) to wish you all here. I apologise as well for the long absence. Things unexpectedly took much longer time, one thing let to another and soon time was just slipping away! *gasp!* By the way, how was your Christmas?! I hope you had an awesome day! Mine was fantastic! While the whole day is not as desired, but I'm just so happy I manage to wear the kind of outfit/look I was going for! And that I didn't forget the small ones like, my watch! (it would feel like something's missing or less perfect if my wrist is without my watch :P). Haha!
Anyway, it's really unfortunate I couldn't attempt the anticipated 12 Days of Christmas (2013 edition, lols). And though it feels rather overdued, I will be including a tutorial here that was promised at least a month ago. (Sorry!)
I did this design during one short getaway. Since it was a short vacation, I didn't want to pack too many nail polishes. Ahh, but you know... I end up with quite a selection (expected, huh? :P). I had every intention to get this up here before Christmas Day came, but.. while I remember to pack my nail polishes and simple tools along. I have conveniently forgot to charge my camera nor bring its charger. Haha! Because of that, I was unable to photograph the needed pictures for the tutorial. (sighs)
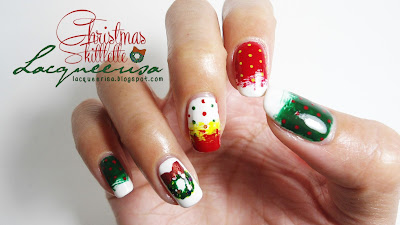
So, what you see here is a remake of the design I did while on vacation. I really love it so I want to share this design with you. I've also done some minor improvisation to make it more 'pulled together' as a skittlette.
*click image for larger view
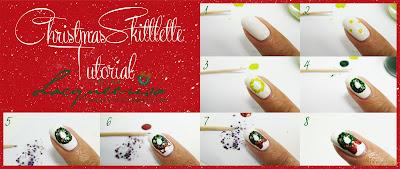
Step 1: Prep your nails with two coats of white nail polish.
Step 2: Take your red/green polish and wipe off most of the polish off the brush.
Step 3: In case your polish is pretty watery (like mine was) brush excess polish off on scrape paper. The key here is to get your polish brush as dry as preferrable (we still need some colours for the dry brush effect, haha!)
Step 4: Lightly swipe your brush horizontally across (left to right, right to left motion) the nail, covering 3 quarter of your nail plate.
Step 5: Fill in the bottom of your nail with nail polish colour, be careful not to cover too much of the dry brush effect.
Step 6: Take a lime green polish and using a toothpick, dot on three dots from the center first. Dot only on the coloured area.
Step 7: Add more dots in alternating spaces as shown.
Step 8: Continue adding more dots on the coloured section. After that, clean up and topcoat - Done!
Christmas Skittlette Middle Finger Tutorial
*click image for larger view
Step 1: Prep nails with two coats of white polish.
Step 2: Choose your desired red and green polish. Use your toothpick or small dotting tool and start dotting half of your nail plate with evenly spaced dots. (Feel free to start with green, if that's what you prefer).
Step 3: Now dot the green dots in the alternative spaces beside the red dots.
Step 4: Continue dotting in alternative space and colours until 'full'. Allow polish to dry. Otherwise you'd get smeared dots like I did.
Step 5: Take your lime green polish and take off excess polish off the brush.
Step 6: Following the earlier tutorial dry brush method, lightly swipe your 'dry' lime green brush horizontally across the nail plate covering half of your nail and some of the dots. Fill in the tip of your nail with lime green polish. Be careful not to cover the dry brush effect.
Step 7: Repeat step 5 to 6 with a red polish but covering just slightly above the lime green colour.
Step 8: Clean up and topcoat - Done!
Christmas Skittlette Ring Finger Tutorial
*click image for larger view
Step 1: Prep nails with white polish.
Step 2: Using toothpick and lime polish, dot four dots evenly spaced following the face of a clock (12 o'clock, 3 o'clock, 6 o'clock and 9 o'clock). These will serve as primary guidance if you face difficulties in drawing a circle.
Step 3: Now that you have your main guides laid out, join the dots in little curves to form a circle.
Step 4: Using a darker green, dot over the lime green to give your wreath a fuller feel. Be sure to leave some lime colours visible as that would give your wreath more dimension.
Step 5: Choose your preferred glitter polish and spread some on a scrape paper. Now, while the polish is still fresh on the paper, use your toothpick to pick and select your glitters. Place them as you like on your wreath (aka, decorate it! :D).
Step 6: Choose a shimmery and opaque polish, draw an outline of bow above your wreath with a toothpick.
Step 7: Once you've gotten the outline of your bow laid out, fill in your bow using the toothpick and touch up where needed.
Step 8: Clean up and topcoat - Done!
And that is all! Super easy and you don't need too many tools. Just a simple small dotting tool or toothpick! :) I hope you find the tutorial easy to follow and easy to understand. If you have any further questions, feel free to ask. Hehe, here's one more picture to end my post for today!
And that is all! Super easy and you don't need too many tools. Just a simple small dotting tool or toothpick! :) I hope you find the tutorial easy to follow and easy to understand. If you have any further questions, feel free to ask. Hehe, here's one more picture to end my post for today!
Hehe, yeaps. That's all for my post today. I hope you still like them despite being late for Christmas. How fast time flies! We're now almost the end of 2013!! Have you planned your New Years Nails yet?


Wohooo!! Welcome back!! I wanted to email you but the holidays were so stressful (had to work -.-). Anyways, you're back and I'm really happy cause I missed you so much T^T
ReplyDeleteThe nail art looks amazing! I like the red and greens with the white together. The dots look very cool, I think I haven't seen any xmas nails with dots this year. My favs are your ring and middle finger hihi Oh and may I ask where you went for vacation? =)
The middle finger tutorial is my favorite, though the whole mani is super cute!
ReplyDeleteGood to see you posting. <3 I've missed the last two manicure mondays, myself. Life just gets in the way, right? x.x That said, the Christmas wreath is too cute. It must have taken a while to take the photos for the tutorials, too. I have so little patience for that. xD
ReplyDeleteYay you do step-by-steps now hehee, makes it easier to snag a design or two on my nails :p Welcome back on board darling, hope to see what you have up your sleeves in 2014 <3
ReplyDeleteYay I'm so glad you're back!!! I had a lovely Christmas with my family and friends. Love the cute little polka dots and the wreath!! Thanks for the tutorial, the detail put in is always appreciated. My new year's nails are basically just me going back to normal programming haha, but they'll be on the blog on new year's if you're interested haha :P Hopefully you have a great 2014!!! :)
ReplyDeleteVery nice nail design and great tutorial! Just as usual :*
ReplyDeleteHappy new year!
Your mani is so cute and fun! Your tutorial makes it look deceptively easy. :P
ReplyDeleteGlad to hear your Christmas was great. Happy new year! Hope 2014 brings you lots of joy! <3
~ Yun
Wow! This is so unique!!! I like the colors very much! Happy New Year to you!!
ReplyDeleteThose nails are beautiful! And I'm glad you're back :D
ReplyDeleteHappy New Year!
*Huggies* Thank you so much!! Yea, end of year is often the most fun yet rush period. :P I've missed you too!! Still sorting through and catching up with blog reading! Whoa, I've been missing lots of posts!
ReplyDeleteI'm glad you enjoyed the nail art ^.^ I like them together too! I think I may wear something like that for Christmas this year (lol yes, that's me planning ever so early...) Ohh I've actually seen a few in my feeds. Hehe. Haha!! Those were my favourites too! Ah, I didn't go anywhere far, just a weekend getaway at another town nearby, LOLS! My Mom had complimentary night stay hotel tickets, soo... we went there to laze around XD Hahahaha!! -- but a worthwhile one considering how it felt as if we went vacation for days :P
Hehe, I know, it's definitely one of my favourite too! Glad you liked them Samantha and thank you so much! ^.^
ReplyDeleteHahaha, Good to see you again as well! I've missed popping by everyone's blogs and commenting. Yeah, kinda sucks when that happens. Ah, but you've had such wonderful Holiday Nails :) Really enjoyed seeing those! Hehe, thank you so much!! It takes awhile but as long as I know which process or key images to take, photographing session is probably one of the easier steps. Editing them were the hard part =/ Still, the whole process is worth it for me, as long as anyone finds these helpful :)
ReplyDeleteHehe, thank you so much! I'm glad you found them useful :D Makes efforts all the more worth it ;) I can't wait to see what 2014 has in store for me too ♥
ReplyDeleteGillian!! Super glad to be back too! Ah, that's wonderful to hear! Hehe, thank you so much! I'm really happy to know you love them ^.^ I'm still catching up on blog readings! I've missed out of sooooo many posts! Ah yes! I would definitely love to see it! Thank you again, and I hope you had a great 2014 start as well ♥
ReplyDeleteHey Tartelette!! Thank you so much! Glad you liked them :) And a very blessed New Year to you too! ^~^
ReplyDeleteThank you so much, Yun! Ahh, the dottings are simple, hehe. I suppose dry brush technique is a little harder to grasp, but with practice one can get the hang of it pretty soon! :) Thank you and I'm glad it looks easy :3 Also!! Happy New Year to you too! Wish you a blessed year too ^.^
ReplyDeleteAna!!! Hiiiiii!! Thank you so much, I'm glad you think so! ^.^ Hehe, I am loving the colour scheme too! I've been seeing it almost everywhere last Christmas, but I love it! And wishing you a wonderful blessed New Year too! ♥
ReplyDeleteI'm glad to be back as well! Thank you so much for the wonderful warm welcome back ^.^ And thankies, glad to hear many of you liked the nails :) A Blessed New Year to you too :D
ReplyDeleteIt's good to see your nails again! These look like super cute Christmas nails -- I love the wreath! Great tutorials :) Hope your holidays were amazing!
ReplyDeletehahaha I like to plan beforehand too, though in the end I'll mostly do something else xD
ReplyDeleteWell, it doesn't matter where you went the most important thing is that it was relaxing! I want to go somewhere too, no matter how far or near, just a little break from everything. Having exams soon and I feel so stressed everytime that period starts :'(
Thank you so much for all the comments on my blog!!! It always puts a smile on my face and I wanna hug you and kiss you and thank you for all the support <3 Wish you nothing but the best for 2014 ^-^