Good Morning Readers! It's been chilly morning here today, and I love it! Hahaha! Finally some cool days :) I hope it stays this way for at least a week! ;)
Also, my sincerest apologies for the sudden short hiatus, I got a little too busy to get this post up for the past week. And I've managed to break my other thumb's nail this time. Nothing of major breakage, but just a little crack at the side. So nub it goes! Haha!! However, I did manage to take photos for the tutorial before the 'little accident' occur. :P
A little re-cap of the nail art again before showing you the tutorial :)
What you will/may need:
Left to right:
Etude House Tint Mint, piCture pOlish Peaches n' Cream, Revlon Revlon Red, Color Combos CBL 110
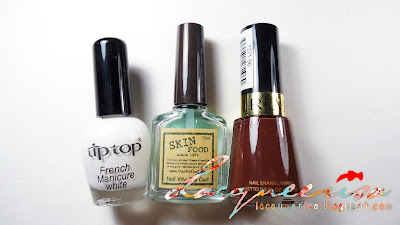
Left to right:
Tip Top French Manicure White, Skin Food Clear Polish, Revlon Chocolate Truffle
Tool used:
Super small sized brush and size 0 brush.
Inspired by Dress Nails Tutorial:
*click to enlarge*
Step by Step:
1. Prep nails with mint/turquoise base colour.
2. Mix a ratio of 1:1 of piCture pOlish Peaches n' Cream and clear polish. This step is to reduce the opacity of the polish for the overall effect.
3. Pick the mixed colour using size 0 brush and paint rosy swirls in random placement on all nails.
4. Now take your orange and mix with clear polish as well in a ratio of 1:1 or 1:2 (depending on how dark or thin you want the orange to be).
5. Paint your second set of rosy swirls beside the pink ones overlapping just a little bit.
6. Mix your white polish with a clear polish with a ratio of 1:1.
7. The white paint is to add a little touch of details to the pink and orange 'roses'. Paint either smaller size swirly roses or just a short curve strokes over the pink or orange 'roses'.
8. Paint the main branches using a brown polish and super small brush on all nails.
9. Then paint the tiny branches using the same brown polish and brush.
10. Thin the red with clear polish (ratio of 1:1) and using the Size 0 brush, create random shaped dots for the abstract cherry blossom look.
11. Using your red polish and super small brush, paint your ribbon bows at the corner of each nails.
12. Using the same red polish, paint a curve ribbon diagonally across your nails. Top coat and you're done!
13. This is an additional step, add touches of gold randomly near the cherry blossoms. Clean up and topcoat. Done! :)
I hope you liked the tutorial. My sincerest apology yet again, as I timed myself this time and realised how mistaken I was. Previously I have mentioned of how "fast" these were. But turns out, I was wrong and these took me approximately an hour (non-dominant hand) to complete all 5 nails. It takes about 5 minutes to 15 minutes per-nail though. On the bright side, it was a great relaxing time. So hahahaha, if you have time to spare and relax and unwind, maybe you'd like to give these a try :P
Happy Tuesday all~! :)


Yay! A great tutorial! Well done.
ReplyDeleteHahaha Haylee!!! So sorry on the error of time taken. But thank you very much! I'm glad you like the tutorial :)
ReplyDeleteThis looks beautiful!
ReplyDeletePretty!!! Also pretty tutorial, it's a rather relaxing look (if you get me) :)
ReplyDeleteHehe I think an hour is pretty fast xD As I said before these are just too perfect and I love them so so much! Thanks for the tutorial hun :X
ReplyDeleteWow this is absolutely amazing. So much detail. Love the colors!
ReplyDeleteGreat tutorial! Though I definitely don't have the skill to do this, it's fun to see how you did it! :)
ReplyDelete~ Yun
Hi Camy! Thank you very much! Glad that you like this look ^^
ReplyDeleteHey Roxy! Thank you so much! I'm glad you're enjoying this look :D
ReplyDeleteHahaha! Thank you so much, Gillian! Not too sure if I do, you mean like relaxing under Cherry Blossom trees? =P But anyhow, I certainly did have an awesome relaxing time attempting this nail art ^.^
ReplyDeleteHahaha, really? Actually yeah, sort of. Considering some of nail art can go up to 3-6 hours. =/ Lols! But that's okay since I'm usually doing my nails when I have nothing else left to do. Sometimes, it's also due to the urge of getting the inspiration out. Okay, I'm getting out of topic here..
ReplyDeleteI'm glad you still love them despite not having other new nail art to show for the time being (hopefully I have something up this week). You're so welcome, it felt really great to share! :D
Hey Kelsey! So glad to hear you love them and the colours! Thank you! :)
ReplyDeleteThank you very much, Yun! Btw, these are really simple. Just random swirls here and there and the branches and dotting with brush :) But I am glad too, to know you enjoy the process ^.^
ReplyDeleteThat looks beautiful! And your tutorials are very good :)
ReplyDeleteThank you very much! That's wonderful to know! Super glad to know you find them good :D
ReplyDeleteoh wow! this turned out very beautiful! I like it very much :)
ReplyDeleteHehe! Thank you very much! So happy to hear you like it :D
ReplyDelete