Happy Sunday all! :D
Oh yeah! So glad to finally be here and posting! I had a swollen left eye (well, it's more like a double puffy eye) few days ago. It got a lot better yesterday and I proceed with doing a simple nail art so I could show something and hopefully it hasn't been too echo-ey here :P
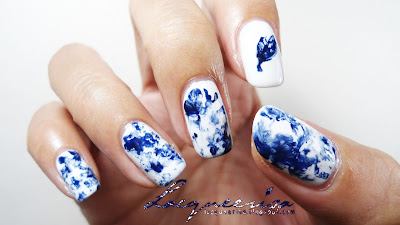
The main inspiration for this nail art is from this artwork by Michael Chase. I like the mixture of colours on the leaf, the play of negative space and I find it really intriguing. Hahaha!
Well, remember that I mentioned I wanted a simple nail art? I was trying to figure out how to attempt the inspiration but I thought I'd just play around and see if I could get some sort of marble-y mix without getting too much mess around. The idea is to prepare a white base colour for all nails. Then using saran/cling wrap method* dabbing on a mixture of navy blue and white. Since the rate of control for this sort of method is only about 50% (to me, at least) I had success on my thumb and pinky finger. Whereas the middle and ring finger were a mixture of dry watermarble technique and saran/cling wrap method.
update note*: there are two kinds of saran/cling wrap techniques. I used the addition of colours as shown in this tutorial by Marta of Chit Chat Nails - and I blobbed on the colours of navy blue and white in thicker amount than usual for that spontaneous swirly/cloudy mix. Oh, if you're curious.. the second type that I know of is the subtraction of colours method, as shown in this tutorial by Criminal Nails
Ahh, I was planning on having all five nails the same way but I just couldn't. And decided to go ahead and try the leaf! Heh, it all sounds so simple in my head. Nail arts always do sound easier in the head, don't they? Lol! Anyway, this is my second try for the leaf on the index finger. Which proves to be more satisfying than the previous one. I used two different sizes of brushes to achieve it. A size 0 one to fill in the leaf and mix around the colour, and thinner one to add the details on the leaf.
Strangely though, like most navy blue and white nails.. These reminded me of oriental porcelains. Hence, the name for it. Hahaha! I'd say the best part of glazing these nails! (Top coating it and seeing it all polished and glossy!) Well, they are not the hardest nor were they as easy as I thought initially, but I love the outcome very much! :D
Okie dokie! That's all for today and I'm off to catch up with blog reading! Have a wonderful day! :)
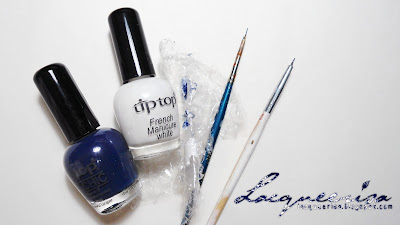
Nail Polishes and tools:
- Tip Top French Manicure White
- Tip Top Nail Chic - In The Navy!
- Scraps from used bubble wraps
- Super Thin Brush (for easier naming, I'd be calling my blue brush size 000 from today onwards)
- Size 0 Brush


So pretty!!! It's really artsy and delicate!! :)
ReplyDeleteI love this!! What a great idea!
ReplyDeleteReally lovely!
ReplyDeleteGorgeous. *w* The leaf looks so good. I've never tried using cling wrap for nail art. Must research this further...
ReplyDeleteHahaha! Thank you!! They certainly look breakable, don't they? XD I'm glad you like them! :D
ReplyDeleteHi Colleen! I'm so glad to know you love this! Thank you very much! :)
ReplyDeleteHi there! Thank you! So happy you love them! :D
ReplyDeleteBethany!! Thank you so much! I'm glad you're loving the leaf too! Hehe, it's a little harder compared to the rest. Oh there's actually two types. One is the adding of colours (http://goo.gl/sHnYSa) and another is the subtraction of colours (http://goo.gl/uQIcQt). For this nail art, I used the addition of colours method by Marta of Chit Chat Nails combined with dry watermarbling technique by Criminal Nails! XD Hahaha! Perhaps I should update this post and add the additional details. :)
ReplyDeleteBut yes! Give them a try! You'll love how easy they are! :D I always use this technique to create interesting or texture looking backgrounds for some nail arts! Lotsa potential this technique has! ^.^
Thanks for the links. ^^ Lately I've wanted to do sponge gradients, but I keep messing them up and taking polish off. u.u Maybe I don't let the base dry for long enough. I imagine this is a pretty similar principle.
ReplyDeleteOMG OMG OMG!
ReplyDeleteI like your nails even more than the original picture ^.^ How you did the leaf..puuurfect! The colors reminds me of porcelain too. I think I have a china vase in this style...? Anyways, yeah, you're so right, nail arts are sooo much easier in the head -.-" But sometimes changing and adjusting leads to beautiful results ^^
This is gorgeous! I love the blue/white color combo, and it really reminds me of porcelain! The leaf you added is super cute! :)
ReplyDelete~ Yun
Oh so gorgeous (:
ReplyDeleteHi Anhy!! :D Thank you very much! That's a hugeee compliment! Though, I like the picture too, pity I didn't capture the colour changes there. Hahahah!! You do ? Awesomeee! xD Hahahaha!! True, plus most of the times art always turns out differently! Ideas are ever growing! ^.~
ReplyDeleteThank you so much, Yun! I'm so glad you love it! Totally loving this combination too and the contrast between them! :D Yay~! I was skeptical at first about the leaf, but turns out it was a good touch to this nail look! ;D
ReplyDeleteHeyy!! Thank you very much! :D
ReplyDeleteNo problem! :D Oh gradients, are a little tricky. Took me a few practice to get them right too. My first ones were a mess XD hahahaha! Yeah, they are pretty similar. But I'd also advice not to sponge on the same area too many times, polishes tends to get tacky and bits of sponges gets stuck.
ReplyDeleteOh apparently, I read here (http://mrcandiipants.tumblr.com/post/59120941675) about pre-wraps but I'm not too sure what that is.. maybe you might be more familiar with the term (then explain to me :P) hahahahahha! X)
This is such an interesting effect! It looks stunning :)
ReplyDelete:D So happy you liked them! ;D Thank you so much! ♥
ReplyDelete