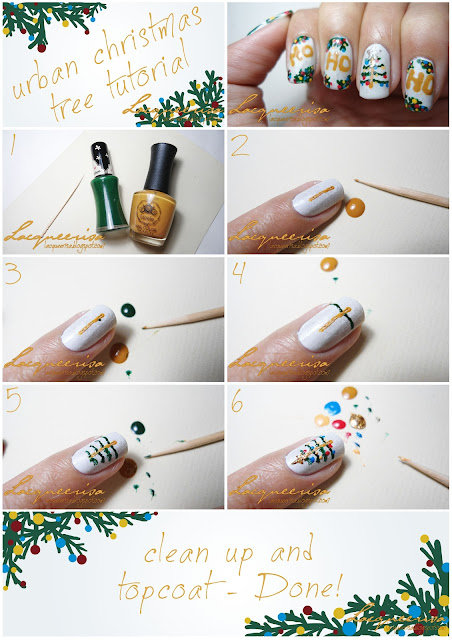
Hello once again! I know I'm late again. So here's the 3rd Christmas nails of the 12 Christmas Nails Series! It was rather impromptu, as I only know in one of my series I wanted to attempt what I defined as Urban Christmas tree. I only had a rough idea in my mind and I've not been slacking exactly, but been pacing around trying to put the idea together so I can finally show something decent here.
Tu-dah! If you noticed, there's something missing after each 'Ho'. Hahaha! Bad placement I tell you! I had intended each of them to end with an exclamation mark! But by the time I was done with the index, I realised there just wasn't enough space. Too lazy to redo again plus I kinda like the width of the 'Ho' done, so I just went ahead - since well, they don't look that bad without the ! ;P
So what do you think about these? They did not come out as initially planned. My whole idea kept revolving while doing this. But I'm glad the way the turned out. One can say, better than I had planned. Yayness to that! And I can't possibly be doing all the Christmas nails without sharing the process of at least one with you! So below here is a simple tutorial for the tree!
So what you'd be needing:
- Toothpick
- A green nail polish
- A light brown nail polish
- A scrap paper where you can make a mess on
Step by step explained (honestly, I'm not the best at explaining, but I'd try):
1. Prepare the basic colours and things needed. And prepare a white base colour. On my nails, I've prepared 2 coats of OPI My Boyfriend Scales Walls and a randomly sponged on grey nail polish - I like a little more texture.
2. Start off with the tree trunk. Its really simple. Just dot your brown polish onto the paper and use the toothpick to pick the colour and draw a vertical line. You don't have to be neat. (ain't that great?)
3. We're gonna work the tree from widest area (the bottom area) to the top. Dot your green polish onto the paper, use the toothpick to pick the green colour and start from the tree trunk.
4. With the green polish and the toothpick, dot a slight curve starting from the trunk moving towards the edge of your nails. Be sure to leave some "breathing space".
5. Repeat step 4 for the rest of the branches and making smaller curves as you make your way to the top of your tree. Again, it's okay to be a little messy and uneven it adds aesthetic values to your tree.
6. Decorate your tree with various colours and little dot ornaments varying in sizes. Remember to dot them just below each branches; because you don't want your ornaments to look like they're floating on air, would you? (if you're attempting space-themed Christmas....then that's a whole different story). Don't forget the star! I have done 8 pointed star in the tutorial picture, which you can see it's not exactly working. I've changed it to a 5 pointed star and chose a silver colour for it which suited the tree better :)
7. Clean up some of the messes that got onto your cuticles and top coat the design! And you're done!
Notes: If you happen to own a star glitter, you can totally just use that as your star for this tree! ;) Oh, and don't forget to clean the tip of your toothpick from time to time during the process of this nail design.
I have purposely done this design purely with just a toothpick because I'm aware not everyone has nail art brush (although I highly recommend getting one if you love doing nail arts, don't need a special one that says 'nail art brush' any watercolour brushes would do just fine - main point cheap and affordable). So yes, every design on the nails shown here are achieved using just a simple toothpick you can find anywhere - and at home! This were pretty easy. I've got all 5 nails done in about an hour!
So I hope you've enjoyed reading this post! It's kinda long.. More so, I hope you like the tutorial and find it useful. I'm not exactly ending this post yet cause I have something more to say. I would advise trying out and practicing with your non-dominant hand first - why? Simple, when your non-dominant can pull it off, you have absolute no doubt your dominant hand can pull this off!
Alright! That's all for today. See ya in another post ;P


Awww it looks super cute! :) I hadn't noticed the Ho lacked their exclamation mark, so you see the message reaches the reader exactly the same ;)
ReplyDeleteHaha!! Thank you! That's great to know. Must the caps! They have their way of making something sound LOUD lol~ ;D
DeleteThis is too cute! I love how you included the steps to creating a christmas tree... very useful! ^^
ReplyDeleteThank you! Glad you enjoy them and happy to know you find the tutorial useful :D
Delete